

In Mac OS X 10.11 (“El Capitan”) Apple replaced the good old “Disk Utility.app” with a completely overhauled and colorful but less powerful version. Many features have been sacrificed in favor of an easier and more usable UI. This post explains how to get that old version back.
DISCLAIMER: Using an outdated version of a system utility bears a lot of risks and may result in the complete loss or corruption of your data. If you’re doing this, you are on your own and Apple will certainly not support you in a way. This is where the fun begins! 😀
I cannot provide the binary of the patched Disk Utility as a download since that would violate Apple’s copyright. Instead, I will explain how you can patch the file yourself:
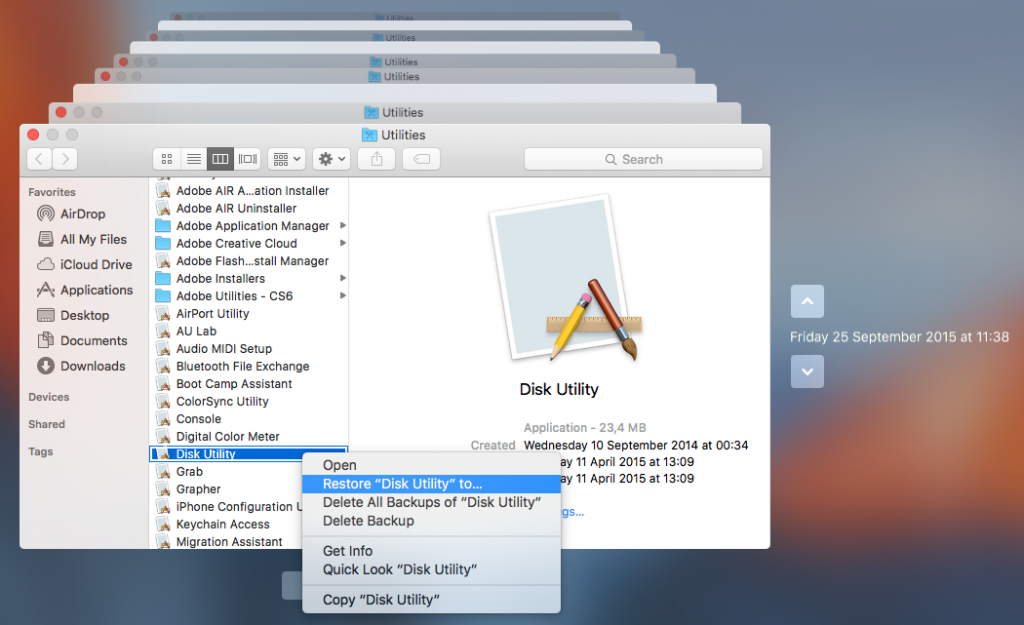
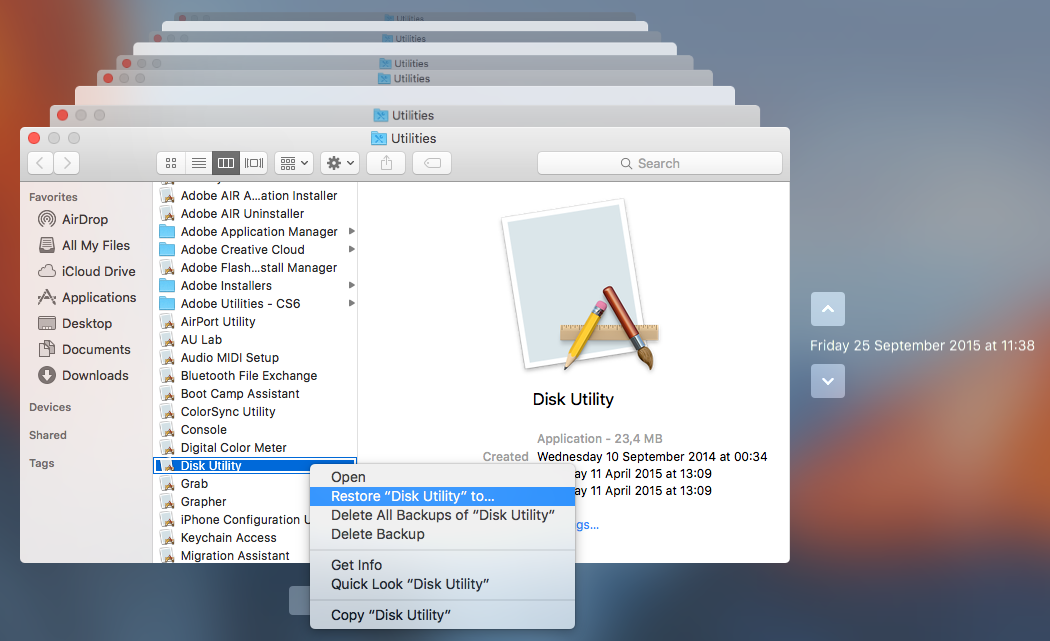
- Open Time Machine to get a copy of the pre-“El Capitan” Disk Utility:

- Go to the Utilities folder (or simply press Command + Shift + U)
- Browse back in time to a backup before you installed El Capitan. Select the Disk Utility app and restore it to a place of your choosing. I use the Desktop. You will have to enter your password, that’s okay.
- Download a Hex editor like the free Hex Fiend.
- Open the Terminal app (which also resides in the Utilities folder, remember: Command + Shift + U) and verify that you have the same version of Disk Utility as me because otherwise the patch will not work (you may have to adapt this to your paths):
$ openssl dgst -sha256 ~/Desktop/Disk\ Utility.app/Contents/MacOS/Disk\ Utility
SHA256(/Users/demo/Desktop/Disk Utility.app/Contents/MacOS/Disk Utility)= 48529e0206d5f238b96f59bd0a4be7817ebe5d63cf4abee0d8c1529c54bf2d78
If the computed hash value (that long hex number) is the same for you as it is for me you can continue.
- Open the restored Disk Utility in Hex Fiend with admin privileges with this command (again adapt the paths to your own):
$ sudo ~/Downloads/Hex\ Fiend.app/Contents/MacOS/Hex\ Fiend ~/Desktop/Disk\ Utility.app/Contents/MacOS/Disk\ Utility
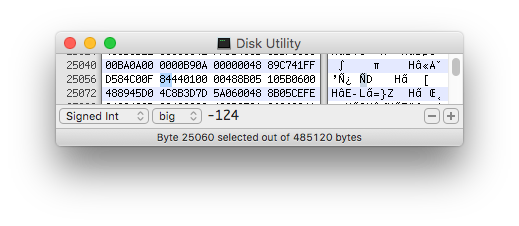
- Scroll down to offset 25056, which is the line where this number appears on the grey’ish bar on the left side of the editor:

- As in the screenshot above you should see these two words (yes, they are called like that):
D584C00F 85440100
- Select the ’85’ in the right word and change it for ’84’. Take care that you overwrite the number instead of insert it. Afterwards it should read:
D584C00F 84440100
- Save the file and close Hex Fiend.
- You can make sure that you did the patch right by calculating another SHA256 hash on the patched file like this (again compare the long hex number):
openssl dgst -sha256 ~/Desktop/Disk\ Utility.app/Contents/MacOS/Disk\ Utility
SHA256(/Users/demo/Desktop/Disk Utility.app/Contents/MacOS/Disk Utility)= 0b9683c6193e011169f39ab7a5565b9eac84d5d1e83f055abc9a5d8ab2e896b0
- Done: Run the app from your desktop.
Explanation
You just changed a processor instruction in the application from JNE (Jump Not Equal, opcode 0F 85) to JE (Jump Equal, opcode 0F 84). Basically it is like this: Disk Utility checks if your system version matches its expectation. If this is not the case (= not equal), it shows a message and terminates. The patch above changes that check: The code now says that if the version does match the expectation (i.e. is equal), it will complain. In other words: This patched version of Disk Utility will not work on any system it was intended to work on, but will start just fine on any other.
Outstanding article, congratulations, just two small remarks:
Paragraph 6., should be (probably a typo, one can always blame copy & paste):
$ sudo ~/Downloads/Hex\ Fiend.app/Contents/MacOS/Hex\ Fiend ~/Desktop/Disk\ Utility.app/Contents/MacOS/Disk\ Utility
The “recovered” old time sake Disk Utility works just fine under Mac OS X 10.11. El Capitan, but Verify and and Repair Disk Permissions buttons are greyed out.
Thank you Paulo! I fixed it in the article.
You’re welcome Justus, that was an humble contribute. I’m really curious about how you find that changing a single byte at that particular offset could make Disk Utility “forth-compatible”, to me is pure voodoo 🙂
Works for me. This is awesome, thumbs up!
Cheers from Wilmersdorf 😉
F.
Justus,
I found this on macrumors.com (http://forums.macrumors.com/threads/disk-utility-where-is-the-raid-functions.1911833/), then shot it out to the Twittersphere. Why Apple removed it from Disk Utility’s GUI is truly baffling.
On behalf of OS X users in the USA, thank you!
Actually if you hole Command+Option+R during boot up you can use the original Disk Utilities that came with your computer. No need to Hex Edit.
Opened package contents and copied the Disk Utility file from the MacOS folder to desktop. Opened file in regular way with the GUI in Hex Fiend. Then made the changes you describe. Classic Disk Utility now works perfectly.
I have gone around the houses a bit to get this to work (fairly new to Mac and terminal commands), but finally it does. No way was I going to buy SoftRaid etc.
Thanks for your article.
Great idea!
Super! Thank you for posting – a small bit of normalcy in a new dumbed down world…
🙂
Pingback: Restaurer l'ancien Utilitaire disque sur El Capitan OSX 10.11 - Photoetmac.com
Avoid the terminal syntax nightmare if you are not familiar with it!!!
Show Package contents of your recovered Disk Utility.app with right click and navigate down to Disk Utility exec file via Contents / MacOS.
Open this file in Hex Fiend
Don’t look for the line as above, but search for the string
D584C00F 85440100
it could be on a different line.
change the 85 to 84 as noted above.
Save, quit and enjoy the fruits of your labors.
Verily/Repair work for me
Disk utility from OS X Base System/Applications/Utilities located at OS X Install ESD/BaseSystem.dmg ( 10.10 version)
After patch it’s work’s ,it’s to pity that the function repair Permissions is greyed out
Maybe there is another hack here ,you very welcome to find it
Ps. Anyway tank you there will always some persons of good will who’ll make up for the the delibarate action of Tim Cook to alter Mac os x and provably to erase any trace of the fouder Steeve job
On the last Disk Utility for Yosemite (version 13), the correct position to change is :
D5 84 C0 0F 85 E8 01 00 (ligne 22304)
Hope this helps 😉
As smooth as it can be !
Thank you SO much !!!
Cheers from France,
Olivier
I used Disk Utility from Yosemite 10.10.5 and I’m running 10.11.1. After the modification I get the message “You can’t open the application “Disk Utility” because PowerPC applications are no longer supported”. Did I do something wrong? I used Find and Replace within Hex Fiend.
Never mind, it worked after the 3rd attempt. I guess I did something wrong with Hex Fiend. Used “Overwrite Mode” with the succesfull alteration. Happy to have this working, thx for the great tip!
Thank you all so much for a job well done.
The new DU has been driving me crazy, just based on the fact that you can’t expand the pane with the volume names. Haven’t been able to read them as I use somewhat long, descriptive names.
Could not get the first Terminal command to compute hash value to work, but followed the instructions by Jochen Dwersteg, using Package Contents and that did the job.
Many thanks. Your mastery of machine code is truly appreciated!
-jadik
Perfect thanks works.
Couldn’t do it in terminal
Gave Disk Utility admin rights then i could changed it in hex app
Apple is closing it’s software to much :-(((
Bless you! Boy, it’s been years since I’ve had to patch a JUMP instruction. Way to go! -Rob
Hello all! I think I have found a much easy way of doing this, which does not require using the Terminal at all. I’ll run through the steps (a lot are similar)… 1) Restore the old version of “Disk Utility” that you want and save it where ever you want it. 2) Open “Show Package Contents” (Right Click). 3) Go to “MacOS” and open the file inside with the Hex Fiend. 4) Change what was said above (Line 25056 and change “85” to “84.” 5) Right click on the File the file you opened in Hex Fiend and (right click) hit “Get Info.” 6) Click the drop down arrow on “Sharing & Permissions.” 7) Hit the lock symbol and enter your password (this is ok). 8) If “Everyone” is set to ready-only, change it to “Read&Write.” 9) Go back into Hex Fiend and save the change (85 to 84 on Line 25056). 10) Open the Restored Disk Utility, and go back and revert what you did in the “Get Info” panel, back to what it was before. Everything should work as it did before El Capitan! If you find this doesn’t work, then sorry 🙁 I don’t have any other thoughts. If the original author finds something wrong with this, I probably won’t see it, so listen to what ever they say! Enjoy! 🙂
Thanks so much for all the help above.
I did have problems using the command line in the Terminal app to open disk utility in Hex Fiend. I checked my file paths and I am pretty sure they were correct. Eventually I made it work by opening the contents of Disk Utility in the finder and worked my way down to the executable Unix file “Disk Utility”. I copied it to the desktop and renamed the original (left inside the Disk Utility App). Then I opened the copy on the desktop with Hex Fiend through its own File Open function. Did a search for the code to be edited, made the edit, and saved it. Then copied it back into Disk Utility package into the correct folder.
The file I edited was from Yosemite 10.10.5. It now works perfectly in El Capitan just as it did in Yosemite. 🙂 Nothing greyed out. Glad to have it back.
Still I am getting a bit worried that Mac is simplifying and removing capabilities in a number of pieces of software. Fore example Photos. I hope this trend does not continue.
Mark
The comment Jochen Dwersteg said above is VERY important because the code was NOT on the same line for me even though I have the same version Disk Utility as you.
Here is what he said:
Show Package contents of your recovered Disk Utility.app with right click and navigate down to Disk Utility exec file via Contents / MacOS.
Open this file in Hex Fiend
Don’t look for the line as above, but search for the string
D584C00F 85440100
it could be on a different line.
change the 85 to 84 as noted above.
Save, quit and enjoy the fruits of your labors.
> I cannot provide the binary of the patched Disk Utility as a download since that would violate Apple’s copyright.
You might not be able to provide a complete patched binary, but that doesn’t mean you can’t provide a binary patch! 😉
“`
#!/bin/sh -x ## or just ` curl -Ls http://git.io/vRozn | sh `.
## Downloads the Mac OS X 10.10 Recovery Partition update,
## Copy’s over the 10.10 version of Disk Utility.app, then
## use git to apply a binary patch so it will run on 10.11+.
cd /tmp
rm -rf DU1010
mkdir DU1010
cd DU1010
# See: https://github.com/wdas/reposado
curl -ORL http://swcdn.apple.com/content/downloads/21/09/031-20634/8d84o1ky5gn2agnf5kiz9eed134n7y3q4c/RecoveryHDUpdate.pkg
xar -xf RecoveryHDUpdate.pkg
hdiutil attach -nobrowse RecoveryHDMeta.dmg
hdiutil attach -nobrowse “/Volumes/Recovery HD Update/BaseSystem.dmg”
cp -Rp “/Volumes/OS X Base System/Applications/Utilities/Disk Utility.app” .
hdiutil detach “/Volumes/OS X Base System”
hdiutil detach “/Volumes/Recovery HD Update”
rm * 2>/dev/null
git apply –no-index <<-PATCH
diff –git a/Disk Utility.app/Contents/MacOS/Disk Utility b/Disk Utility.app/Contents/MacOS/Disk Utility
index 20f16f995699699ac5841a455c261a2e45e6a4e5..ce4994ac078a99803ba6b5f3467fae425b5bf643 100755
GIT binary patch
delta 44
scmZoTC);pNcEgiI#+K%%iS17l8G)Dyh?#+y1&CRJm~H#hM0ROb0OUIqApigX
delta 44
scmZoTC);pNcEgiI#@6PiiS17l8G)Dyh?#+y1&CRJm~H#hM0ROb0OVa1A^-pY
PATCH
mv "Disk Utility.app" "Disk Utility (10.10).app"
open .
“`
(https://gist.github.com/geoff-codes/b96bc9c5bca538aa0819)
To repair permissions in El Capitan, you will still need to do it in another way. The Yosemite version of Disk Utility will not work. The simple alternative is to use the command line.
sudo /usr/libexec/repair_packages –repair –standard-pkgs –volume /
See
http://osxdaily.com/2015/11/04/verify-repair-permissions-mac-os-x/
If you wish to replace Disk Utility on your recovery partition as well use this tutorial: http://jacobsalmela.com/osx-customize-recovery-partition-with-your-own-apps/
When it gets to the steps involving dmtest, to get the newest version of the El Capitan Recovery Update, go to this link: https://swscan.apple.com/content/catalogs/others/index-10.11seed-10.11-10.10-10.9-mountainlion-lion-snowleopard-leopard.merged-1.sucatalog.gz
and Search (ctrl+F/cmd+F) -> “Recovery” -> Find the one furthest down the page and paste the link to the .pkg file into your browser.
Once you have the package file, dmtest can be extracted and used in just the way that the tutorial says.
Hope this helps someone!
Used Jochen method to change and it was super easy. Thanks!!
10.11.3 update broke this patch. With this update, unfortunately the old DU no longer works.
Erol – what does it do? Does it stop the patched Disk Utility from opening, or does it change the hdiutil enough so that the patched DU no longer can “wrap” it’s options?
@Erol its working fine for me in 10.11.3, maybe try reapplying it?
@geoff nixon’s patch works okay on 10.11.3, so no worries!
Perfect! This helped me so much. Thanx.
Ich hatte das Problem, dass iMac eine DVD nicht erkennt und deshalb auch nicht auswerfen kann.
Ich habe das geschilderte Rezept durchgeführt, und …
ES KLAPPT
Ich habe das Programm DiscUtil.app umbenannt, um beide Versionen fahren zu können; damit konnte ich die nicht erkannt DVD per Software auswerfen.
Ich verstehe nicht, wie Apple von den Programmen solche Funktionen entfernen kann.
Besten Dank für den Tipp.
iMac Mitte 2011, El Capitan, 17.02.2016
A very impressive thread,
Which version of Disk Utility are we talking about? Tried the approach opening of Disk Utility from 10.6.8. (v 11.5.2) directly using Hex Fiend, but, I could not find the complete string suggested, I could find the second word. But, changing the 85 to 84 did not make it executable under 10.11.3. When I’m stuck, I’ll start up my 10.6.8 machine, and, use the more powerful disk utility from there.. BTW, the current version of Disk Utility is 15.0.
I’m using ‘Version 13 (606)’.
Pingback: Good Old Disk Utility | Craig (Robert) Wright
Hello,
Excellent !!!!
Thank you very match
Version OS X 10.11.4
Thank you very much indeed. I just liked the old version better than the new. Working fine in 10.11.4. I would say though that SoftRaid , for those who decry it above , does have advantages and for the normal user that wants simple mirrored RAID, the LE version is an excellent buy. It has the distinct advantage of picking up failing disks far in advance of other apps. Thanks again from New Zealand
blown away, thank you so much Justus, you’ve saved me a whole lot of trouble with that damn new utility. you’re amazing !!
Hello!
I changed the 85 to 84 using Hex Fiend and everything is working fine.. However, I not want to unlock the hidden features (more imaging and debug menu) using terminal. Has anyone been able to do this successfully? It isn’t working for me the usual way. Maybe I am not using the right terminal commands? Or if I have to change something else to get it to work.. Any help would be appreciated!!
(THANK YOU SO MUCH to JUSTUS and JOCHEN! [Also JOHN for the post about Recovery Partition] YOU GUYS ARE AWESOME!!)
Ha! Never mind. Silly me. Got it to work.
Awesome, thank you!
Thanks for the fantastic tip! It didn’t quite work at first to transfer Disk Utility from 10.10.3 to macOS Sierra Developer Beta 2. These are the exact steps I used to make it work:
1. Copy /Applications/Utilities/Disk Utility.app to my Desktop
2. Open ~/Desktop/Disk Utility.app/Contents/MacOS/Disk Utility in a hex editor called 0xED
3. Find and replace D584C00F85440100 to D584C00F84440100
4. Save and quit
5. Copy /System/Library/PrivateFrameworks/DiskManagement.framework to ~/Desktop/Frameworks/
6. Open Terminal
7. cd ~/Desktop
8. export DYLD_FRAMEWORK_PATH=$(pwd)/Frameworks
9. ./Disk\ Utility.app/Contents/MacOS/Disk\ Utility
And it works! Even the Verify Disk Permissions!
Thanks again!
If you have any questions, you can email me from http://junebeetle.github.io/contact 🙂
Spoke too soon.
Copying the framework seems to make it be “unable to communicate with the Disk Management daemon”. But without the framework it says:
dyld: Symbol not found: _kDMMediaTypeCDROM
Referenced from: /Users/will/Desktop/./Disk Utility.app/Contents/MacOS/../Frameworks/DUSupport.framework/Versions/A/DUSupport
Expected in: /System/Library/PrivateFrameworks/DiskManagement.framework/Versions/A/DiskManagement
in /Users/will/Desktop/./Disk Utility.app/Contents/MacOS/../Frameworks/DUSupport.framework/Versions/A/DUSupport
Any ideas? Email link above 🙂
The modified Disk Utility does not work in Sierra (public Beta).
What will need to be done to make it work? I really liked using it in El Capitan.
Thanks
I have not yet looked at Sierra and think it is too early to invest effort since everything is still very much in flux. Once the first stable release hits the App Store, I will look into what it takes to evade the ‘improved’ Disk Utility a little longer. 😉
Best,
Justus
You can modify the DiskManagement.framework and DiskImage.framework with El Capitan versions and the old tool will work. The Disk utility’s that comes on Mac OS Sierra will not work then.
Replacing the DiskManagement.framework and DiskImage.framework with El Capitan versions is just enough to open the Disk Utility. Most functions will return framework cannot communicate with disk management daemon. You also need to replace diskmanagementd in /usr/libexec with the one from El Capitan but that will completely break the new Disk Utility. I was able to get it working on Sierra without modifying the Sierra frameworks. It is a little too much to explain but basically you modify the location of the DiskImage.framework and DiskManagement.framework inside the Disk Utility.app binary and the DUSupport.framework binary to point to a new location where you have the El Capitan frameworks. Then edit the El Capitan frameworks to reference the same location. Then you are left with only the diskmanagementd. My solution is to run couple of scripts that replace the Sierra diskmanagentd with the El Capitan version on-the-fly and put it back when you close the Disk Utility 13. That way both Disk Utilities work.
Google disk utility 13 for Sierra and the first link will be my solution. It requires SIP disabled since we need to modify /usr/libexec
When you run it you must provide sudo rights to the osascript binary to run an AppleScript and then a script that make everything work.
Hope someone finds it useful.
Thanks.
Thanks to you for this solution. I had a look at your script, it is simple and ingenious.
Hello Justus,
thanks a lot for your article!
I’d tried it to use in MacOs Sierra, but no way.
Did you know anything about to make it runnable in OS X 10.12?
Will be glad for answer
Thanks and all the best from Hamburg
Henrik