
In Mac OS X 10.11 (“El Capitan”) Apple replaced the good old “Disk Utility.app” with a completely overhauled and colorful but less powerful version. Many features have been sacrificed in favor of an easier and more usable UI. This post explains how to get that old version back.
DISCLAIMER: Using an outdated version of a system utility bears a lot of risks and may result in the complete loss or corruption of your data. If you’re doing this, you are on your own and Apple will certainly not support you in a way. This is where the fun begins! 😀
I cannot provide the binary of the patched Disk Utility as a download since that would violate Apple’s copyright. Instead, I will explain how you can patch the file yourself:
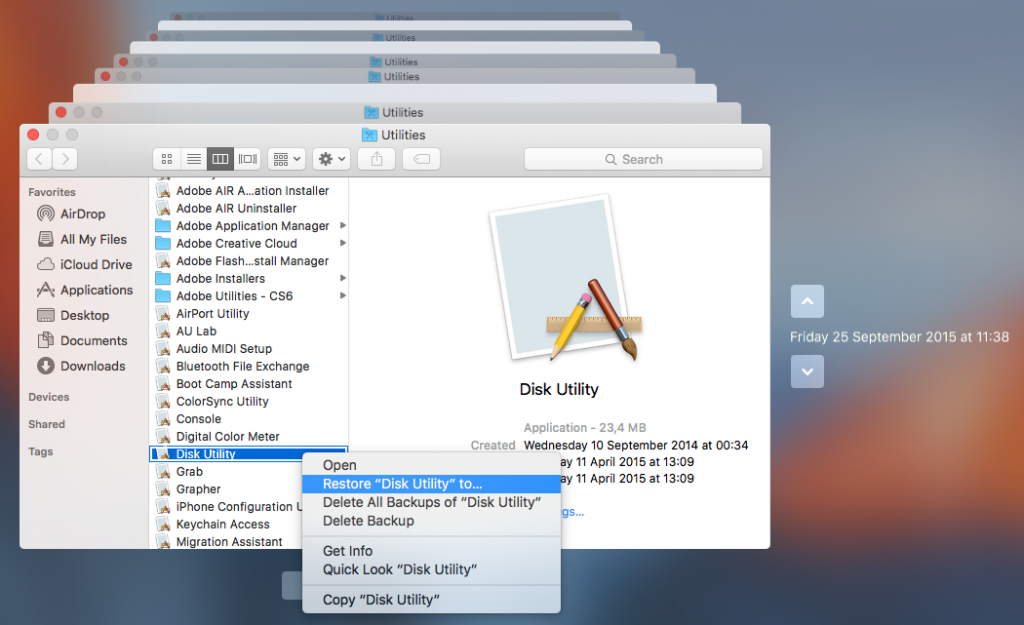
- Open Time Machine to get a copy of the pre-“El Capitan” Disk Utility:

- Go to the Utilities folder (or simply press Command + Shift + U)
- Browse back in time to a backup before you installed El Capitan. Select the Disk Utility app and restore it to a place of your choosing. I use the Desktop. You will have to enter your password, that’s okay.
- Download a Hex editor like the free Hex Fiend.
- Open the Terminal app (which also resides in the Utilities folder, remember: Command + Shift + U) and verify that you have the same version of Disk Utility as me because otherwise the patch will not work (you may have to adapt this to your paths):
$ openssl dgst -sha256 ~/Desktop/Disk\ Utility.app/Contents/MacOS/Disk\ Utility
SHA256(/Users/demo/Desktop/Disk Utility.app/Contents/MacOS/Disk Utility)= 48529e0206d5f238b96f59bd0a4be7817ebe5d63cf4abee0d8c1529c54bf2d78
If the computed hash value (that long hex number) is the same for you as it is for me you can continue.
- Open the restored Disk Utility in Hex Fiend with admin privileges with this command (again adapt the paths to your own):
$ sudo ~/Downloads/Hex\ Fiend.app/Contents/MacOS/Hex\ Fiend ~/Desktop/Disk\ Utility.app/Contents/MacOS/Disk\ Utility
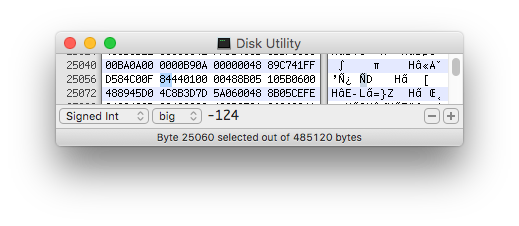
- Scroll down to offset 25056, which is the line where this number appears on the grey’ish bar on the left side of the editor:

- As in the screenshot above you should see these two words (yes, they are called like that):
D584C00F 85440100
- Select the ’85’ in the right word and change it for ’84’. Take care that you overwrite the number instead of insert it. Afterwards it should read:
D584C00F 84440100
- Save the file and close Hex Fiend.
- You can make sure that you did the patch right by calculating another SHA256 hash on the patched file like this (again compare the long hex number):
openssl dgst -sha256 ~/Desktop/Disk\ Utility.app/Contents/MacOS/Disk\ Utility
SHA256(/Users/demo/Desktop/Disk Utility.app/Contents/MacOS/Disk Utility)= 0b9683c6193e011169f39ab7a5565b9eac84d5d1e83f055abc9a5d8ab2e896b0
- Done: Run the app from your desktop.
Explanation
You just changed a processor instruction in the application from JNE (Jump Not Equal, opcode 0F 85) to JE (Jump Equal, opcode 0F 84). Basically it is like this: Disk Utility checks if your system version matches its expectation. If this is not the case (= not equal), it shows a message and terminates. The patch above changes that check: The code now says that if the version does match the expectation (i.e. is equal), it will complain. In other words: This patched version of Disk Utility will not work on any system it was intended to work on, but will start just fine on any other.
Steviebeth asked about debugMenu and advancedImage Options. This is how my Disk Utility version is patched hopefully someone finds it useful:
The following patches will give you a Disk Utility with debug mode on and advanced image options on by default and capable of running on El Capitan.
If you replace the DiscRecordingUI.framework on an El Capitan usb installer or recovery partition with the one from Yosemite, you can have Disk Utility 13 as well as the new Disk Utility or just replace it. To have both you need to modify two files: InstallerMenuAdditions.plist and Utilities.plist
I had automated this process with a utility but I haven’t tested it recently. If you want to try it google injectDiskUtility.zip. Have also a little app called extractDiskUtility that extracts the Disk Utility.app from the Install OS X Yosemite.app and another diskUtilityPatch that automates the following patches.
My version check is patched differently. It patches the JNE to JMP instead of JE.
To apply the patches copy the each of the perl commands, paste to terminal and replace [Drag & Drop Disk Utility binary] with the path to the Disk Utility binary, usually accomplished by drag and dropping to terminal.
systemVersionCheck
————————
\xD5\x84\xC0\x0F\x85\x44\x01\x00\x00\x48\x8B\x05\x10\x5B\x06\x00 [original]
\xD5\x84\xC0\xE9\x45\x01\x00\x00\x00\x48\x8B\x05\x10\x5B\x06\x00 [patched]
perl -pi -e ‘s|\xD5\x84\xC0\x0F\x85\x44\x01\x00\x00\x48\x8B\x05\x10\x5B\x06\x00|\xD5\x84\xC0\xE9\x45\x01\x00\x00\x00\x48\x8B\x05\x10\x5B\x06\x00|g’ [Drag & Drop Disk Utility binary]
enableDebugMenu
———————-
debugMode can also be achieved by drag and dropping the Disk Utility binary on a terminal window and adding –debugMenu at the end.
\x3C\x33\x74\x48\x48\x85 [original]
\x3C\x33\x66\x90\x48\x85 [patched]
\x85\xFF\x75\x58\x48\x8B [original]
\x85\xFF\x66\x90\x48\x8B [patched]
perl -pi -e ‘s|\x3C\x33\x74\x48\x48\x85|\x3C\x33\x66\x90\x48\x85|g’ [Drag & Drop Disk Utility binary]
perl -pi -e ‘s|\x85\xFF\x75\x58\x48\x8B|\x85\xFF\x66\x90\x48\x8B|g’ [Drag & Drop Disk Utility binary]
expertMode (advanced image options)
————–
\xFF\x00\x75\x25\x4C\x89\xEF
\xFF\x00\xEB\x25\x4C\x89\xEF
perl -pi -e ‘s|\xFF\x00\x75\x25\x4C\x89\xEF|\xFF\x00\xEB\x25\x4C\x89\xEF|g’ [Drag & Drop Disk Utility binary]
Hope you guys like it!
The patched Disk Utility, as per these instructions, works OK under 10.11 but NOT under 10.12.
I initially tried using the Disk Utility that came with OS X 10.9 but the checksum did not match. I dug up a copy of a 10.10 installer I’d saved, and installed 10.10. I grabbed Disk Utility from that installation, and the checksum worked. Disk Utility is listed as version 13 in both the 10.9 and the 10.10 versions.
Would it be possible for you to repatch DU for 10.12.2? I just miss the “good old” disk utility
Thank you.